
|
|
|
|||||||
| Register | Album Gallery | Thread Gallery | FAQ | Community | Calendar | Become a Paid Member | Today's Posts | Search |


|
|
|
Thread Tools | Display Modes |
|
|
|
#1
 02-18-2023, 01:16 AM
|
||||
|
||||
|
I was backordered on some of the necessary suspension parts (lower a-arms were one of the big issues). Because of this, I decided to press forward building other parts of the car -- in particular, the interior.
One of the first jobs I did was to modify the old 3-on-the-tree column. I found a bowl from a floor shift car, swapped out the steering wheel assembly, eliminated all unnecessary column shift pieces internally, re-lubed the column and reassembled it with a new three-spoke finger grip wheel. I reduced the size of the interlock pieces and safety wired them. I discovered drilling the interlock pieces was much more difficult than it sounds. A local machine shop gave it try and gave up. Other machine shops laughed...Just before I sent the piece off to get EDM machined, I tried a bit for granite tile. It worked!:  The tach is an AutoMeter Pro Comp Monster. I used a conventional xl-size hose clamp to mount it, but I hated the look. So I trimmed back everything I could on the clamp, and then used a large heat shrink sleeve to cover it. I think the mount turned out well:  Electric water temp and mechanical oil PSI are also AutoMeter ProComp jobs. I didn't like any commercially available gauge brackets so I made my own: 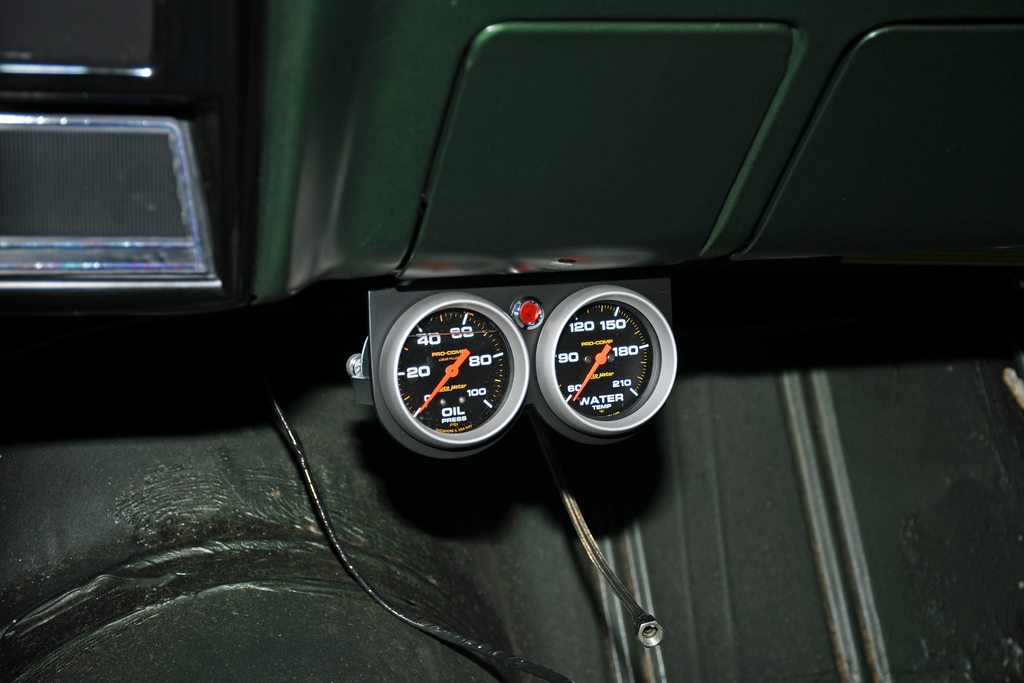 I always use a warning lamp for line locks. Instead of the standard cheap Hurst job, I used this aircraft indicator from Aircraft Spruce: 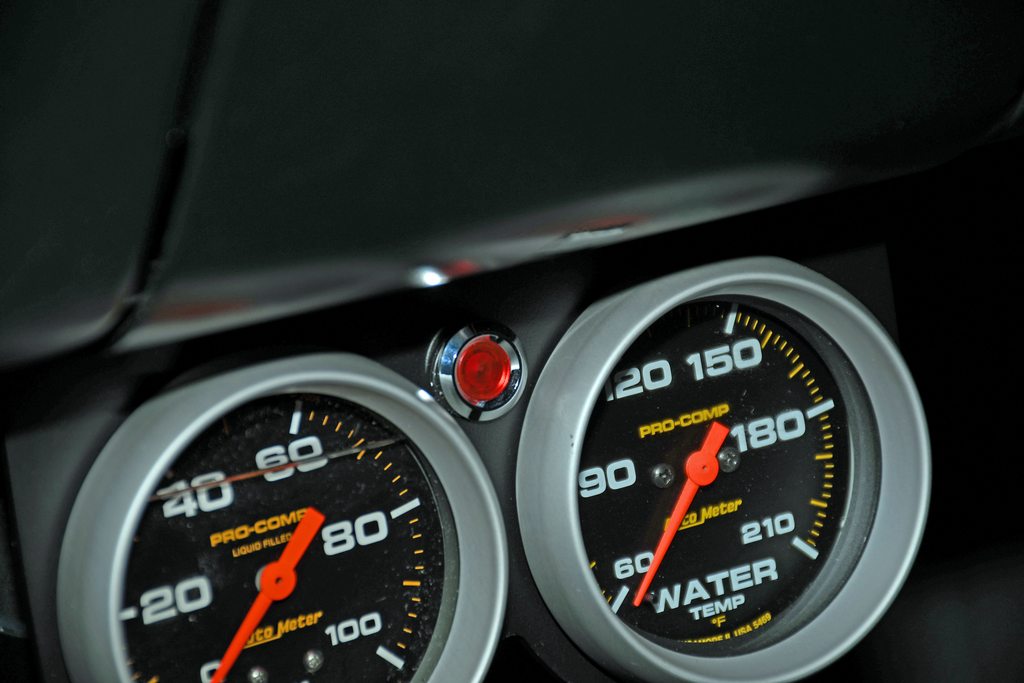 On the engine compartment side, I used a 90-degree AN bulkhead fitting for the oil psi gauge. There's a -3AN Teflon line in the cockpit that goes from the passenger compartment side of the fitting to the pressure gauge. And on the engine side, I use a short -3AN Teflon line to the Dart block oil gallery just above the bell housing flange. It's all very easy to assemble and disassemble. 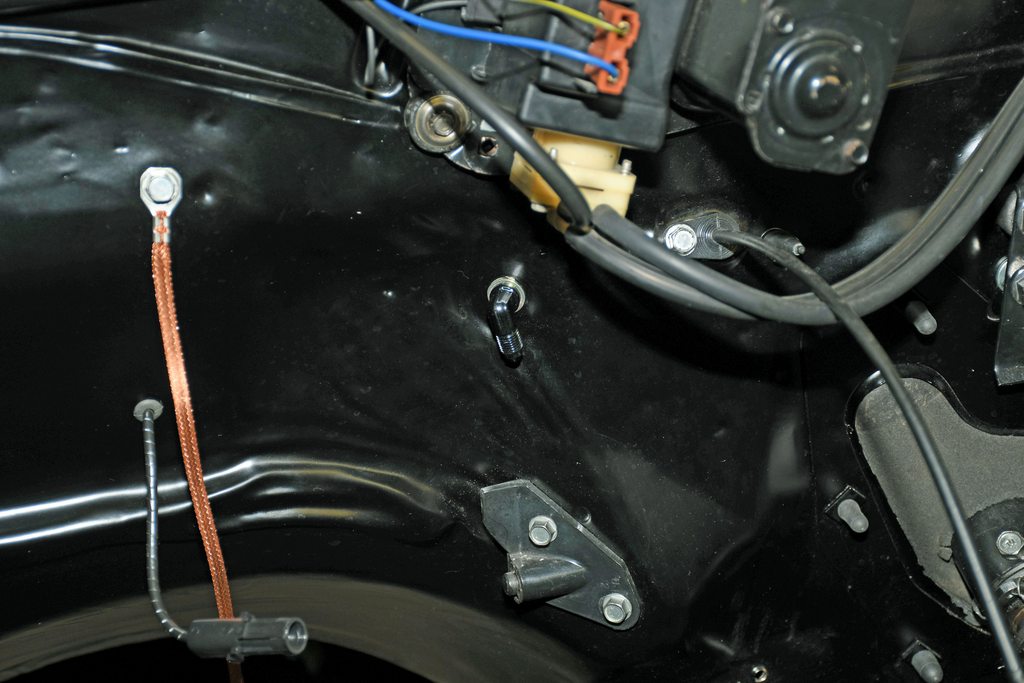 This is the sender harness for the water temp gauge. I wrapped it in aircraft spi-wrap and then wrapped that with OEM style harness tape so it looks sort of stock: 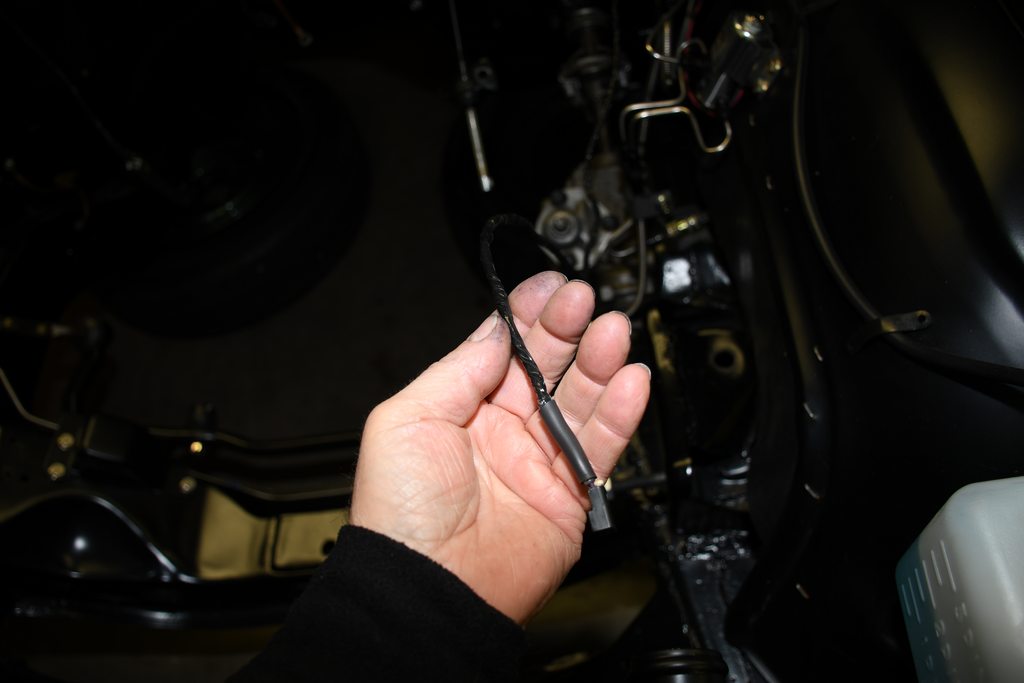 Much of a new big block engine harness was disassembled. I stripped every wire I didn't need and then re-wrapped it with harness tape. The harness is now very minimal: 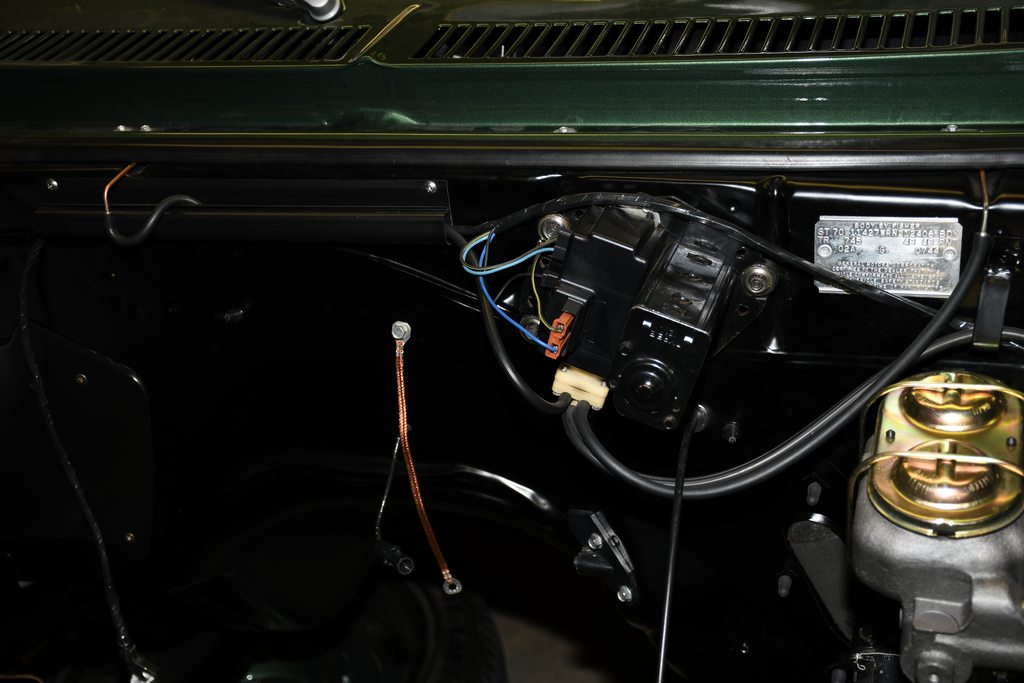 I cut, drilled and shaped a 1/4-inch thick nylon board in the shape of the backside of the OEM-style firewall heater delete plate. This became my ignition board inside the car: 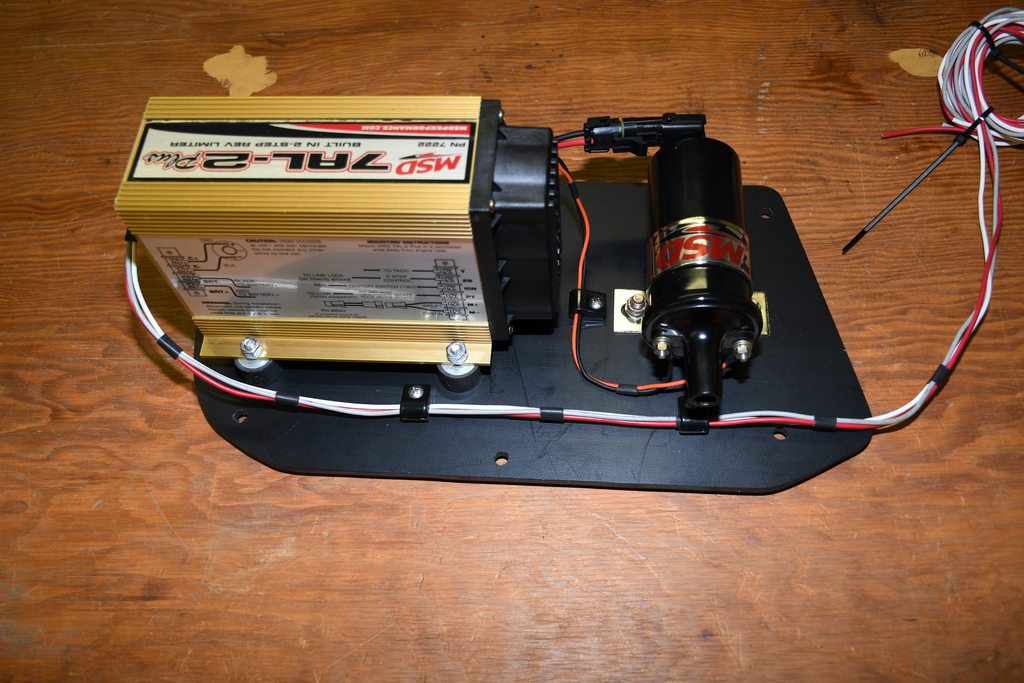 As you can see, I use an MSD 7AL2 and a very conventional MSD compatible coil for ignition. I think the wiring job came out pretty well:  Here's the whole thing mounted up under the dash. It is just over the carpet line. I used AN fasteners to hold the works in place. 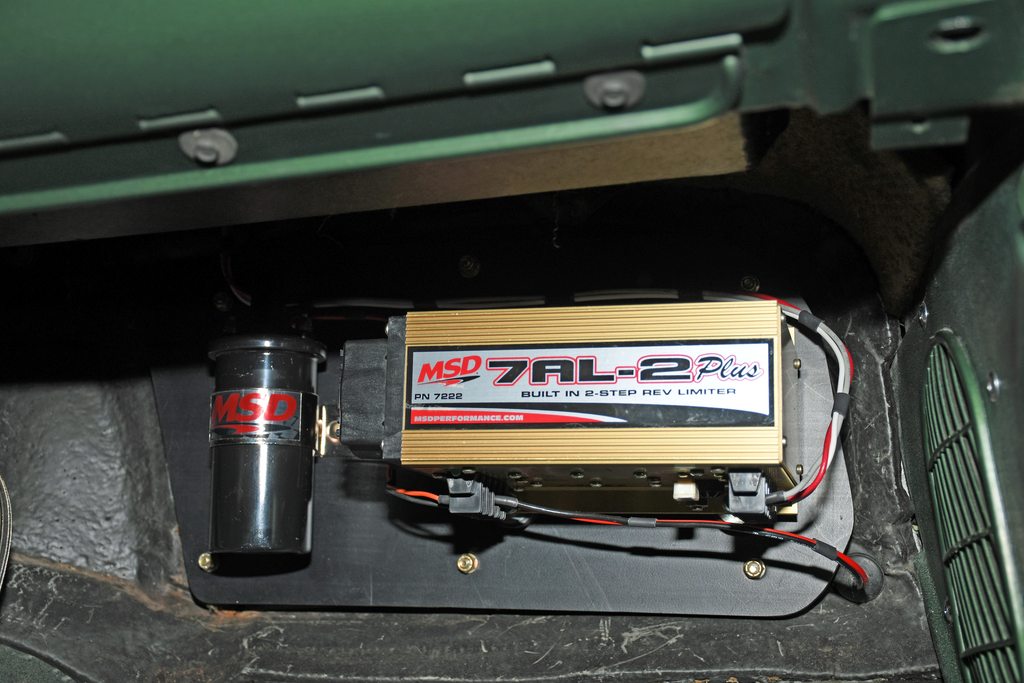 Outside, the main power/ground wires for the MSD route directly to the battery (per MSD instructions). The actual switch for on-off is wired to the fuse box. I used silver plated aircraft wire here -- it has a much smaller diameter for the wire gauge, and the jacket is much stiffer. I wrapped it with harness tape and the wire goes through one of the firewall insulator plugs: 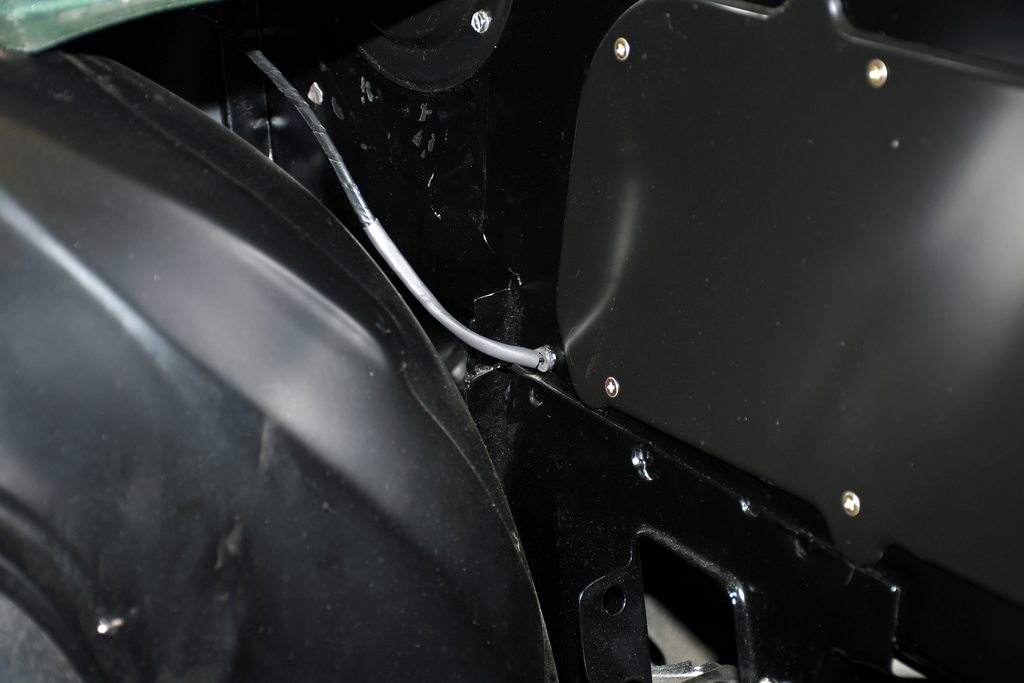 Downstairs, I replaced the back seat seat belt bolts with longer grade eight fasteners. This provides a spot to hang the exhaust turnouts under the car.  That's all for now...More later... 
|
| The Following 8 Users Say Thank You to Arrowsmith For This Useful Post: | ||
69M22Z (02-18-2023), big gear head (02-18-2023), BJCHEV396 (02-18-2023), dykstra (02-18-2023), L78_Nova (02-22-2023), olredalert (02-18-2023), Pro Stock John (02-18-2023), Xplantdad (02-18-2023) | ||
|
#2
02-18-2023, 06:54 PM
|
|||
|
|||
|
----The original 12-bolt is in Red Alert to this day. I know the car doesn't get any use today, but think of the punishment it's been thru. I know the axles were hardened or replaced, but have no idea of the manufacturer. They were checked for twist many times over my ownership and never a sign of anything wrong!.....Bill S
|
| The Following 2 Users Say Thank You to olredalert For This Useful Post: | ||
Arrowsmith (02-18-2023), dykstra (02-19-2023) | ||
|
#3
02-19-2023, 01:02 PM
|
||||
|
||||
|
My friend Shane is running a '69 Camaro in A/S with a Jerico 4 speed and a Moser 12 bolt. The car has broke into the 9s.
__________________
Freddie 1969 Camaro RS/SS396 (427) 4 speed
|
| The Following 2 Users Say Thank You to big gear head For This Useful Post: | ||
69M22Z (02-20-2023), Arrowsmith (02-19-2023) | ||
|
#4
02-19-2023, 01:34 PM
|
|||
|
|||
|
Quote:
__________________
'58 Apache pick up restomodding with twin turbo 522 '78 Z28 4sp being restored '78 Z28 32,000 survivor, Og Yellow paint, AC. '70 W30 convert TRIBUTE '70 CANADIAN Nova SS396 L78 Pro Street '69 CANADIAN Nova SS 396/350 hp '67 CANADIAN Nova SS 427 10 sec. driver '66 CANADIAN Nova SS Race Car '69 FIREBIRD Tubbed Racecar '61 CANADIAN Pontiac Bubble top 409+/4sp (SOLD) '31 ALL STEEL Chevy P.U. GONE (EX-WIFES NOW)
|
|
#5
02-19-2023, 06:20 PM
|
|||
|
|||
|
Looking forward to getting back to the Nova build story.
More details and more pics please, let'er rip. Paul
|
| The Following User Says Thank You to CamaroNOS For This Useful Post: | ||
Arrowsmith (02-19-2023) | ||
|
#6
02-19-2023, 10:11 PM
|
||||
|
||||
|
Moving along (and hopefully, this thread won't cluttered up with 9-inch versus 12 bolt arguments or other "stuff" down the road), I worked on the fuel delivery system. It's been a sort of work in progress. I'll explain later...
The main premiss here was to follow what others like "stock appearing" racers use. I totally dig that idea: I didn't want a fuel cell. I didn't want a sump in the tank. I wanted the car to look closer to stock:  Some of the FAST folks are using Holley Hydramats in their gas tanks. It is heavily used in off road racing applications too. Basically, a Hydramat is a wicking agent. It absorbs fuel.  Here's a closer look:  There are a number of different choices for Hydramat configurations. Mine is setup to accept a honking -10 AN (5/8-inch) pickup. It is held to the floor of the gas tank by way of four rare earth magnets. Do they hold? L-O-L. I spent well over an hour trying to pry two apart. To move them around to where I wanted them in the tank, I used a piece of wood doweling.  Speaking of the tank  , This is a new Spectra tank. I cut that hole in the top to install the Hydramat. , This is a new Spectra tank. I cut that hole in the top to install the Hydramat.  I fabricated a cover from aluminum. When I did this, I decided I needed an easy to find gasket that is resistant to fuel. What you see is the baseplate gasket for a Holley Dominator carb.  Outback, I had a friend TIG weld a -10 AN bung to the top of the tank for the feed line, along with a -8AN bung for the return line, as well as a -8AN bung for the vent. The tank uses a non-vented cap. Here's a pic of the feed and return line AN bungs:  In order to get the Hydramat in the tank and not destroy the skin on my arm, I duct taped the opening:  Here's a peak inside the tank. The Hydramat sits alongside the fuel level sending unit. I simply cut off the original pickup tube and plugged the OEM sender fuel line (more later).  A big issue is finding hose that can be immersed in fuel. Believe it or not, AN hose doesn't like being immersed and neither does a wide range of OE-style hoses. The line must be flexible though. After a ton of research, I came up with this (below). It is hose that is used for things like snowmobiles, garden tractors and so on. It's capable of "living" inside gasoline. Acquiring it in -10 wasn't exactly easy. The fittings are from Earl's. The hose clamps are stainless steel jobs from Breeze (made in the USA). I use this same hose to handle the fuel line return inside the tank. It's not a good idea to allow the return line to spray inside the tank. Instead, the line should be on the tank floor:  Here's the tank top plate sealed up:  I blocked off the OEM style fuel pickup line internally and capped it. This way, the fuel sender still works: 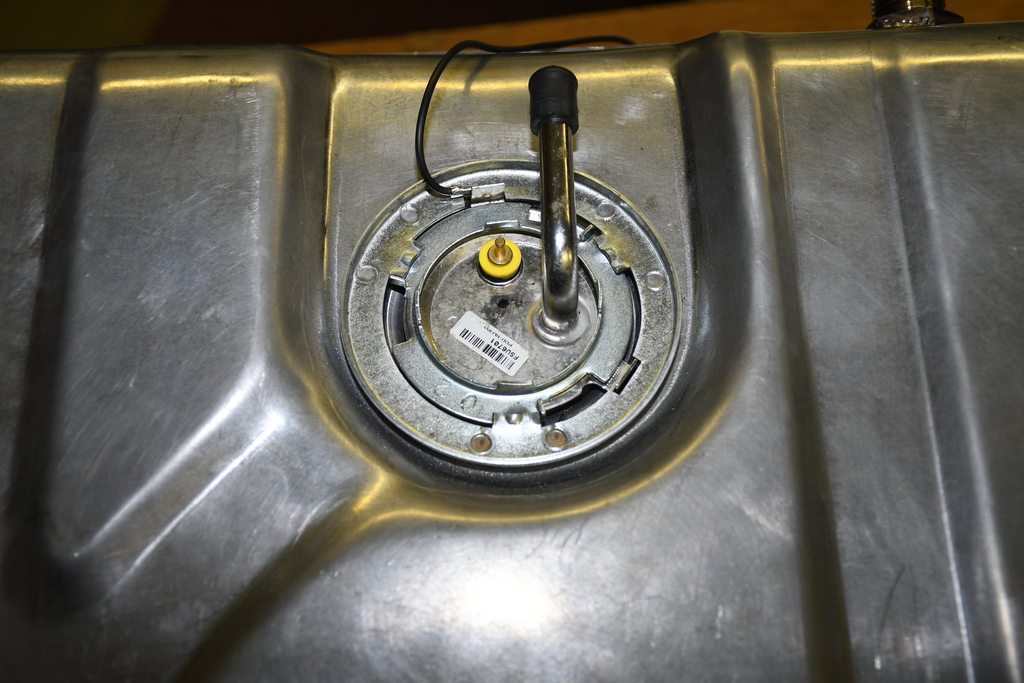 This is the -8AN (1/2-inch or so) fuel vent line. You can't see, but there is an AN breather fitting on top of the 90-degree fitting. I made a bracket out of aluminum to mount the vent line. 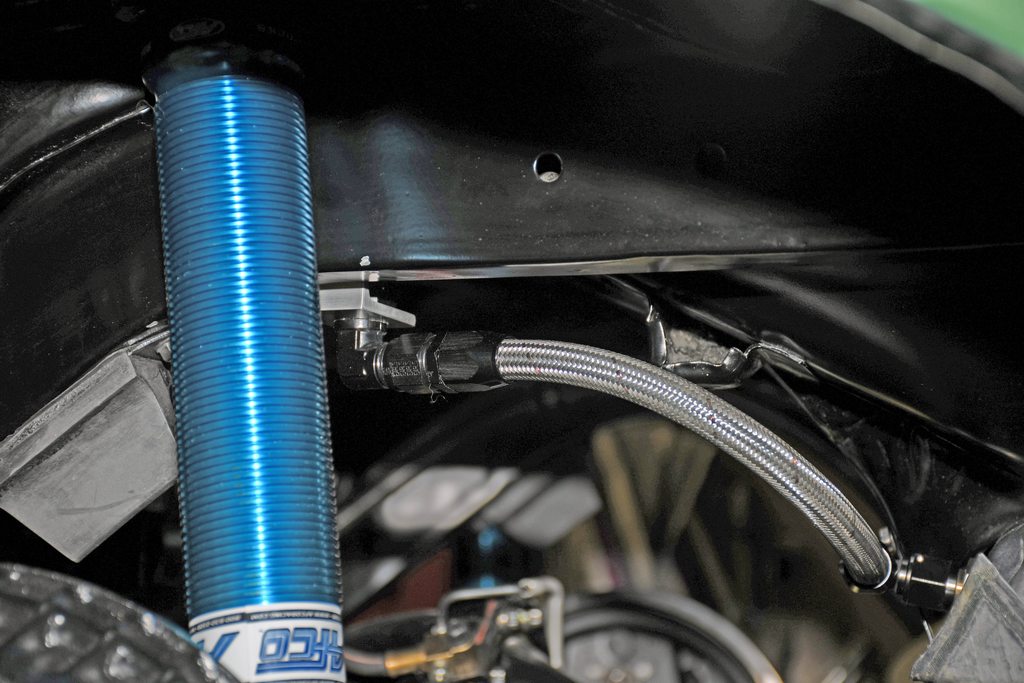 This electric pump is a recent (this past week) change. I originally assembled the car with an off-shore Holley Marine mechanical pump, an Enderle mechanical fuel injection by-pass valve and a composite fuel pump pushrod. It all worked a-ok, but it wasn't consistent. The car would run nicely and then (in almost a heartbeat), the fuel level in the floats pretty much went out of control. I believe the huge mechanical pump I was using was overwhelming the pintle in the by-pass valve. Additionally, I was concerned about the longevity of the composite fuel pump pushrod (pretty much mandatory with a billet roller cam like I'm using). The big Weldon in-line electric pump along with a Weldon regulator is the ultimate solution. That Weldon pump will pull a prime (some users claim it can pull a prime in something like 6-feet, which is seriously impressive!). Weldon's regular business is manufacturing pumps and fuel system parts for aviation. They have good idea of what's going on....L-O-L. By the way, there's a bit of camera distortion here. I could not plumb the pump directly from the bung to the feed line, hence this layout. The reason it couldn't be done is because of minimum bend radius of AN hose. Bend it too tight and it will kink (and consequently be turned into junk). Here's the pump and return line setup: 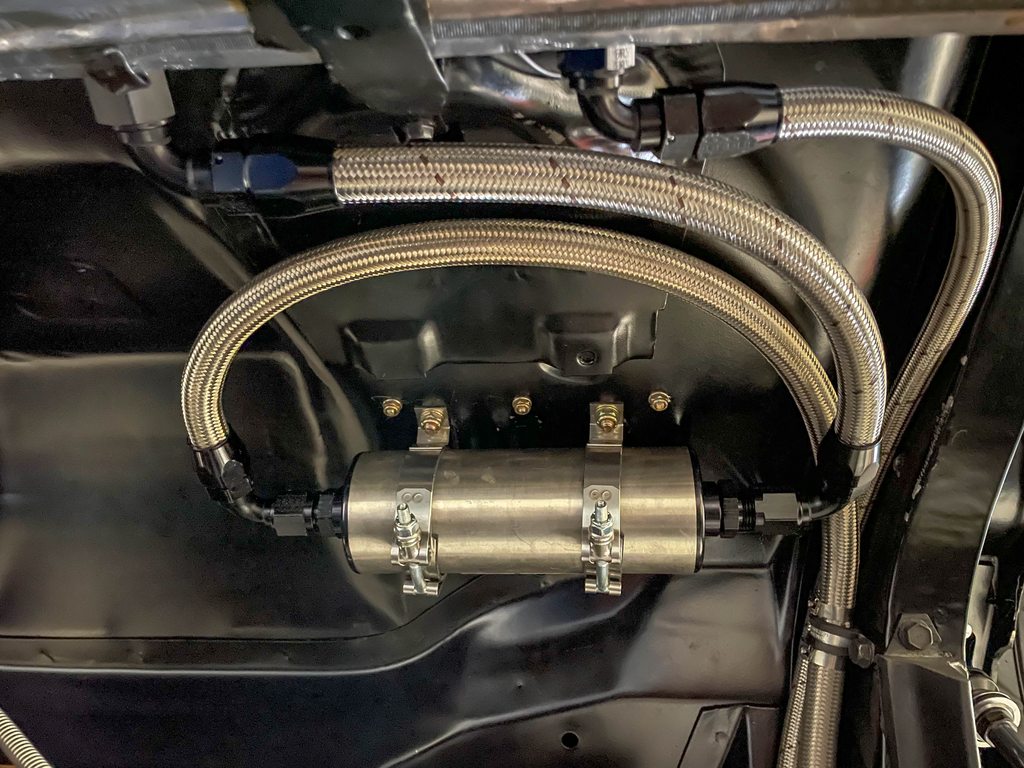 Moving forward, the Nova has a high flow -10 AN Holley billet fuel filter inline. The Hydramat acts as a pre-filter, while this is the after-filter: 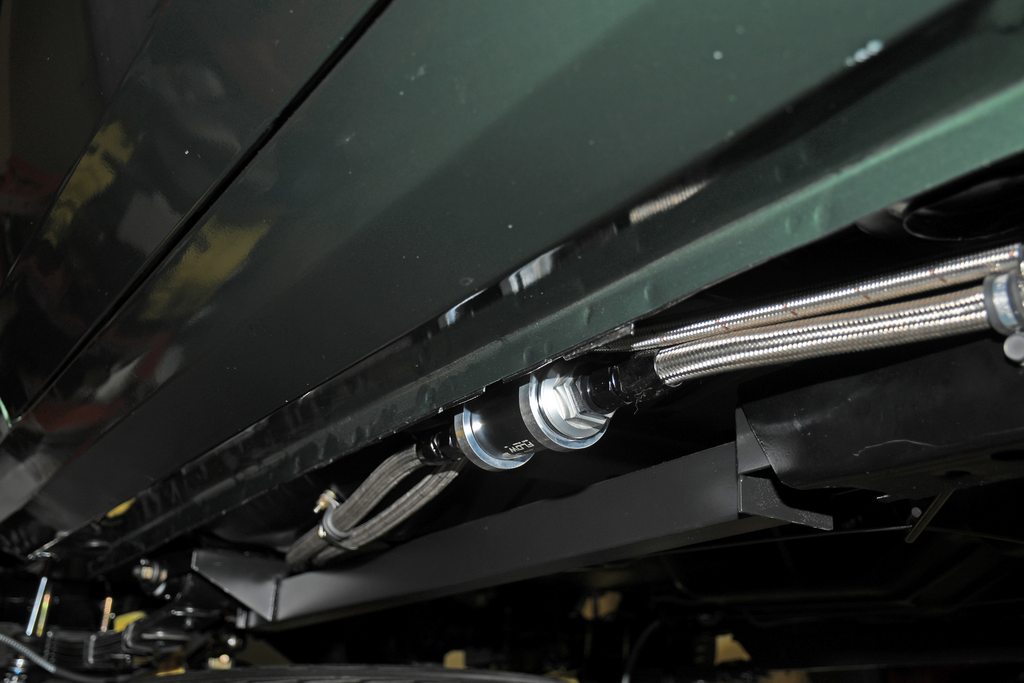 I used aircraft clamps to attach the line and stainless steel band clamps to tie the pressure (feed) line to the return line:  At the firewall, the hoses run over the inner fender to the front of the car. I don't like hoses that route close to the headers, hence this layout. I've used it in a number of builds and it works great.  The fuel and return lines run to this bulkhead under the stock style battery tray. The bracket is a simple 90-degree piece I built, and the fittings are bulkhead style. You can't see this when the battery tray is installed. By the way, I pressure test each hose after assembly. Easier to fix it now than later. Upstairs, the car is now getting a Weldon fuel pressure regulator with a return. I'll update that down the road:  That's all for now... Last edited by Arrowsmith; 02-19-2023 at 11:42 PM.
|
| The Following 10 Users Say Thank You to Arrowsmith For This Useful Post: | ||
69M22Z (02-20-2023), big gear head (02-20-2023), Crush (02-19-2023), dykstra (02-20-2023), John Brown (02-19-2023), L78_Nova (02-22-2023), L_e_e (02-21-2023), olredalert (02-20-2023), Tenney (02-20-2023), Xplantdad (02-20-2023) | ||
|
#7
02-20-2023, 01:15 AM
|
||||
|
||||
|
Looks great Wayne!

__________________
Bruce Choose Life-Donate!
|
| The Following User Says Thank You to Xplantdad For This Useful Post: | ||
Arrowsmith (02-20-2023) | ||
|
#8
02-20-2023, 04:58 AM
|
||||
|
||||
|
Great details and pics Wayne.Great build bud!!
__________________
https://www.youtube.com/watch?v=gkDf7PPRzJ0
|
| The Following User Says Thank You to BJCHEV396 For This Useful Post: | ||
Arrowsmith (02-20-2023) | ||
|
#9
02-20-2023, 10:29 AM
|
||||
|
||||
|
I love your attention to detail. Great job!
__________________
Dave Dykstra 1968 Camaro Palomino Ivory/Ivy Gold interior -Delivered to Courtesy Chevrolet, Los Angeles, CA 2013 Corvette Grand Sport 60th Anniversary -Delivered to Bill Jacobs Chevrolet, Joliet, IL NCRS#66003 Education is what you get when you read the fine print. Experience is what you get if you dont.-Pete Seeger Dykstra Motorsports
|
| The Following User Says Thank You to dykstra For This Useful Post: | ||
Arrowsmith (02-20-2023) | ||
|
#10
02-21-2023, 08:55 PM
|
|||
|
|||
|
Did you keep the rear shocks (AFCO's) in the stock locations or did you move them inboard? You have mentioned in the past that the lower shock mount inhibits the tire?
__________________
'58 Apache pick up restomodding with twin turbo 522 '78 Z28 4sp being restored '78 Z28 32,000 survivor, Og Yellow paint, AC. '70 W30 convert TRIBUTE '70 CANADIAN Nova SS396 L78 Pro Street '69 CANADIAN Nova SS 396/350 hp '67 CANADIAN Nova SS 427 10 sec. driver '66 CANADIAN Nova SS Race Car '69 FIREBIRD Tubbed Racecar '61 CANADIAN Pontiac Bubble top 409+/4sp (SOLD) '31 ALL STEEL Chevy P.U. GONE (EX-WIFES NOW)
|
|
|
|


 Hybrid Mode
