
Dedicated to the Promotion and Preservation of American Muscle Cars, Dealer built Supercars and COPO cars. |
|
|||||||
| Register | Album Gallery | Thread Gallery | FAQ | Community | Calendar | Become a Paid Member | Today's Posts | Search |


|
|
|
Thread Tools | Display Modes |
|
|
|
#1
 01-31-2013, 04:36 PM
|
||||
|
||||
|
I sold commercial printing & coding/printing equipment for a few years...
A silk screen would be a terribly inefficient way to linearly code something. The <span style="font-weight: bold">Packard TVR Suppression 1Q73</span> was in all likely hood done in line while the wire was being manufactured, with a rotary letter press, (rubber stamp on a wheel which is inked with either an anilox roller, or some inking system)  The cylinder indications were also done with a rubber stamp (probably not rotary and most likely while the individual wire sets were being put together) although the impression pressure was much higher as indicated by the "halo's around the numbers" where the paint/ink squeezed out.
__________________
~JAG~ NCRS#65120 68 GTO HO 4 spd Alpine Blue /Parchment 2 owner car #21783 71 Corvette LT1 45k miles Orig paint - Brandshatch Green - National Top Flight - last known 71 LT1 built. 71 Corvette LT1 42k miles Original paint - Black - black leather - only black LT1 known to exist. NUMEROUS Lemans blue Camaros, Monza Red and Daytona Yellow Corvettes & a Chevelle or two... Survivors, restored cars, & other photos https://picasaweb.google.com/lh/myphotos 
|
|
#2
02-01-2013, 12:48 AM
|
||||
|
||||
|
Back to the unitized wire set rebuilding.
Received the new wire set for the "octopus" and new spark plug terminal ends for the old wire set. I got a box of 50 of the spark plug terminal ends and installed eight of them with the correct crimping tool. It's amazing what having the right tool for the right job will do! The angles on these terminals are an exact match to the originals.   The new donor wire set I got was from Lectric Limited. No one makes unitized wire sets, so these are for the regular points style ignition. They are date coded 3rd quarter 1971. I removed the tower boots and terminals from each new wire. I then carefully removed the bowtie terminal ends from each of the remnants of the original cut wires from the "octopus" with a small screw driver to pry the edges up and then a needle nosed pliers to bend the tabs. Once I got the terminals off, I noticed that not only did the original wires have a section of the inner graphite core stripped and folded over to lie against the terminal base, they also had a one inch section of copper wire stuck into the end of each wire and bent over to also form a contact with the terminal. In addition to that, the terminal has an internal barb that pierces the wire and touches the internal graphite wire. I used the new crimping tool to affix each bowtie terminal to the wires. I also use some White Out to number each wire so I knew which is which.  After getting all the wires matched to length, (the new set has the correct number of long, medium and short wires that match the unitized wires length), I applied a layer of black weatherstrip adhesive to both sides of the octopus and the channels where the wires set. I inserted all the wires and seated the terminals through the octopus. I then installed the octopus on the cap and bolted the coil down on top which created the perfect clamp for the wire set. I also used a bunch of large binder clips and clothes pins to squeeze the outer edges together and will let it sit overnight. 
|
|
#3
02-01-2013, 07:35 AM
|
||||
|
||||
|
Did you check the conductivity and resistance before you clamped it?
Jan
|
|
#4
02-01-2013, 11:57 AM
|
||||
|
||||
|
Yes. There is a slght problem though with checking ohms on carbon cores versus wire core spark plug wires. The old set was very sensitive to how hard you pressed the probe to the wire ends. The new set were very close to each other, resistance-wise.
|
|
#5
02-01-2013, 09:59 PM
|
||||
|
||||
|
Here is the 1112203 (1973) distributor all back together with the new wires and octopus installed.
I checked the resistance of all the plug wires with an ohm meter and they are the same as when they were single wires with the old boot style terminals, so nothing was affected by the transplant.   Here's a question for any unitized experts out there: Both of my coils have this strange "hammertone" black finish on them. Is this how it should look? Or should it be gloss black like the NOS coil packs I have seen. 
|
|
#6
02-10-2013, 04:47 PM
|
||||
|
||||
|
Documentation............you can never have too much!! [img]<<GRAEMLIN_URL>>/biggthumpup.gif[/img]
Congrats Steve!
__________________
Sam...  
|
|
#8
02-11-2013, 02:16 AM
|
||||
|
||||
|
Steve knowing your quest for rare Pontiacs... I thought you could try to run this one down next... looks like a Black and Blue 73 T/A SD.
__________________
~JAG~ NCRS#65120 68 GTO HO 4 spd Alpine Blue /Parchment 2 owner car #21783 71 Corvette LT1 45k miles Orig paint - Brandshatch Green - National Top Flight - last known 71 LT1 built. 71 Corvette LT1 42k miles Original paint - Black - black leather - only black LT1 known to exist. NUMEROUS Lemans blue Camaros, Monza Red and Daytona Yellow Corvettes & a Chevelle or two... Survivors, restored cars, & other photos https://picasaweb.google.com/lh/myphotos
|
|
#9
02-11-2013, 03:34 AM
|
||||
|
||||
|
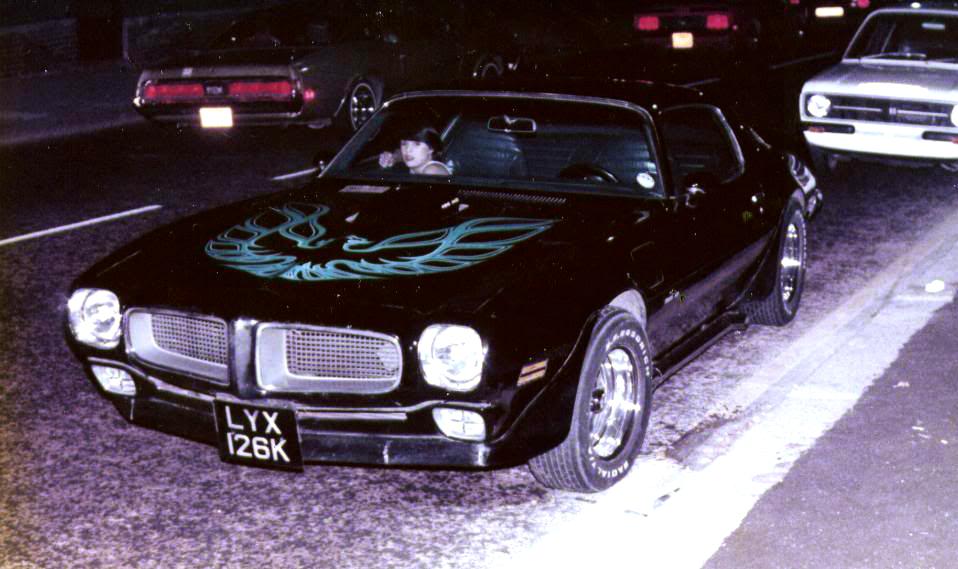
Its a 1971. You can tell by the little squares in the grills and the seat pattern. Is that a British or Australian license plate?
Nice vintage first generation BFG Radial T/As, Cragars, and black sidepipes. The chick is vintage late 1970s wth the Dorothy Hamill "Camel" hairdo and the spaghetti strap dress. BTW, there was one black 73 SD T/A produced. It still exists. Its a rather famous story. The original ordering dealership figured a way to get an SD allocation by making up a story that a longtime customer wanted a black Trans Am and was prepared to buy a black Camaro instead. So when Pontiac gave them the OK to special order a black Trans Am, the dealer just happened to order it with the SD455 engine option. The car was delivered with a red front bumper, and red spoilers/flares since those items were produced in color already. And were supposed to be painted black by the dealer upon arrival. The dealer kept them red.
|
|
#10
02-17-2013, 06:14 PM
|
||||
|
||||
|
I've been doing some more hunting and found some NOS stuff for the unitized project. I located an NOS ignition module, and NOS distributor cap housing and an NOS coil (which is on the way at the moment).
I also found another remanufactured unitized distributor at an online auto parts store and when I opened the box it turned out to actually be a 1972 1112127 (455 non-HO) with a 1K13 date code. So that is as close as I'm going to get to a 1112133 at the moment. And seeing that I only spent about 1/8 of the cost of a 1112133 for it, I was quite happy.   Here's the instructions with the NOS control module. It even had the little tube of heat-sync grease still in the box. 
|
|
|
|


 Hybrid Mode
